How to Make Gift Tags from Cardstock
Cut classic gift tags from cardstock, punch and reinforce the hole, and rule a grid to make a dozen from one sheet. Sizes for mini, classic and large tags included.

Tutorial at a glance
Materials
- Cardstock or cereal-box-weight card
- Ruler and pencil
- Scissors
- Hole punch
- Twine or narrow ribbon
- Paper reinforcement rings (optional)
Once you know how to make gift tags, you never have to hunt for one at the last minute. A sheet of cardstock, a pair of scissors and a hole punch are enough to produce a dozen tags in less time than it takes to wrap a single present.
Handmade tags also solve the matching problem. You choose the color and size, so the tag suits the paper instead of fighting it. The classic shape, a rectangle with two clipped corners, is the best place to start.
What you need
- Cardstock, or a cut-up cereal-box-weight card
- A ruler and a sharp pencil
- Scissors
- A hole punch
- String, twine or narrow ribbon
- Optional: paper reinforcement rings, or scraps of paper to make your own
Cardstock is simply heavy paper, roughly 65 to 110 lb cover weight, or about 175 to 300 gsm. Anything in that range is stiff enough to hang without curling. Ordinary printer paper is too thin by itself, although it can be glued onto card as a decorative layer.
Most of these items belong in a basic wrapping kit anyway; see the full list of gift wrapping supplies if you are starting from nothing.
Cut the classic tag shape
The standard tag is about 2 x 3.5 in (5 x 9 cm), large enough for two names and small enough for most gifts.
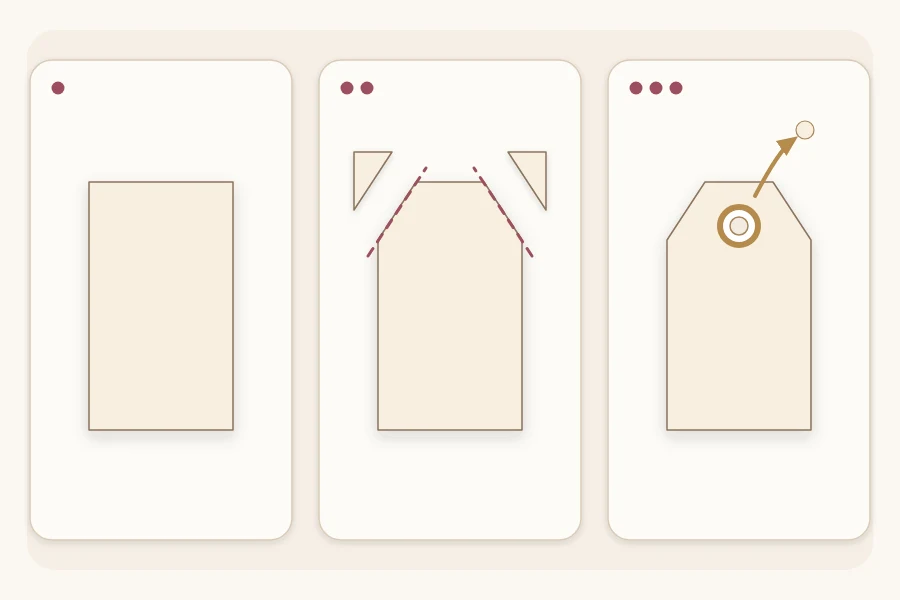
- On the back of the cardstock, draw a rectangle about 2 in (5 cm) wide and 3.5 in (9 cm) tall. Cut it out along the lines.
- At one short end, make a pencil mark about 1/2 in (1.3 cm) in from each corner along the top edge, and another the same distance down each side.
- Join each pair of marks with a straight line and cut along it. Both top corners are now clipped at 45 degrees.
- Erase any pencil that still shows, or simply use the unmarked side as the front.
Cut with long, smooth strokes, closing the scissors almost fully each time. Short snips leave a jagged edge on thick card. A craft knife and metal ruler give the straightest lines, but that is a job for an adult, or for a child with adult help.
Punch and reinforce the hole
Center the hole between the two clipped corners, about 3/8 in (1 cm) down from the top edge. Any closer and the card is likely to tear through; much lower and the tag hangs awkwardly.
To find the center quickly, fold the tag in half lengthwise very lightly, just enough to pinch a tiny crease at the top, and punch on that mark.
A reinforcement keeps the hole from ripping when the tag is tugged. Stick a ready-made paper ring over the hole, or make your own:
- Cut a small circle of paper, about 5/8 in (1.5 cm) across. Tracing a small coin works.
- Glue it over the spot where the hole will go.
- Punch through the circle and the tag together.
A contrasting color turns the reinforcement into a decoration. No punch at hand? An adult can pierce the card with the tip of a skewer over a folded towel, then widen the hole with a pencil point.
Make a batch from one sheet
Cutting tags one at a time is slow. Ruling a grid on the sheet first lets you cut a whole set with a few long cuts.
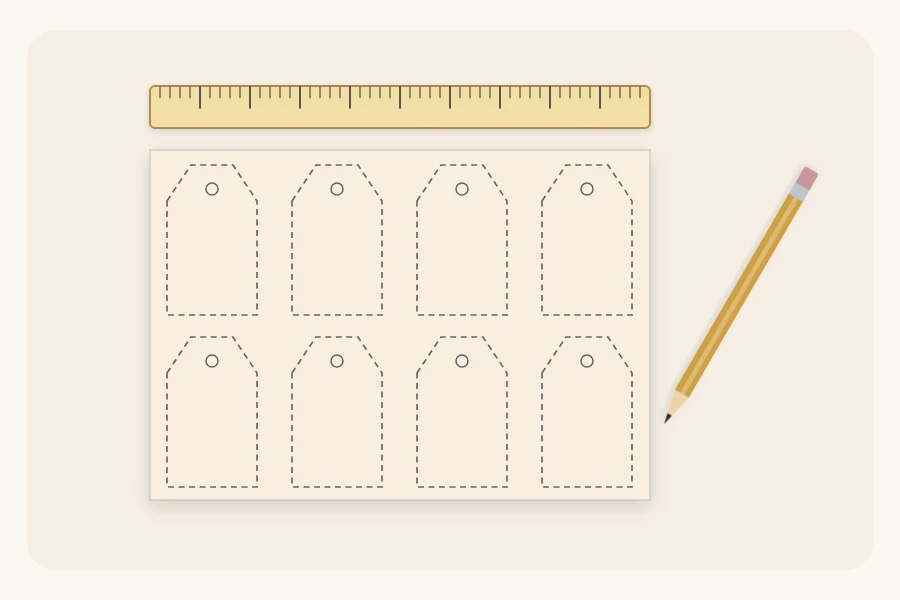
A letter-size sheet, 8.5 x 11 in (21.6 x 28 cm), fits twelve classic tags: four across and three down, with a narrow strip of waste on two sides.
- On the back of the sheet, mark every 2 in (5 cm) along the short edge at both the top and the bottom, then join the marks with ruled lines.
- Mark every 3.5 in (9 cm) along the long edge on both sides and join those as well.
- Cut along the long lines first to make strips, then cut each strip into rectangles.
- Clip the corners. Stack two or three rectangles and trim them together to keep the angles consistent.
- Punch the holes one tag at a time so they stay centered.
Tip
Keep one finished tag as a template. Next time, trace around it instead of measuring, and mark the hole by pushing a pencil point through.
Choose a size for the gift
The classic size is not the only one. Keep the same proportions and adjust to suit the box.
| Tag | Size | Corner clip | Good for |
|---|---|---|---|
| Mini | 1.25 x 2.25 in (3 x 6 cm) | 3/8 in (1 cm) | Small boxes, bottles |
| Classic | 2 x 3.5 in (5 x 9 cm) | 1/2 in (1.3 cm) | Most gifts |
| Large | 3 x 5 in (7.5 x 13 cm) | 3/4 in (2 cm) | Big boxes, long messages |
Write on the tag and add the string
Write the names on the tag before attaching it. A tag that is already tied on swings around, and pressing down on it can dent the paper underneath.
Test your pen on an offcut of the same card. Kraft and uncoated cardstock take pens and stamps well, while glossy or coated card can smear, so give the ink a minute to dry. Faint pencil guidelines, erased afterward, keep the writing level.
For the string, cut about 8 in (20 cm) of twine or narrow ribbon and attach it with a lark’s head knot: fold the string in half, push the folded loop through the hole, pass both ends through the loop and pull snug. The knot and the best places to put the tag are shown step by step in how to attach a gift tag.
Simple ways to decorate plain tags
A blank tag in a good color needs very little. If you want more, small touches work better than covering the whole surface.
- Glue a panel of leftover wrapping paper to the front, leaving a narrow border of card showing.
- Stamp a row of dots with the eraser end of a pencil and an ink pad, a trick that also suits kraft paper gift wrapping.
- Rule a single line near the bottom edge with a colored pen.
- Stick on a miniature bow cut from scraps, following the steps for a paper bow at half the example size.
For other outlines, such as circles, hearts and folded tags, browse these gift tag ideas.
Frequently asked questions
What paper should I use for gift tags?
Use cardstock, which is heavy paper sold in sheets for crafts, or reuse card of a similar weight such as a cereal box. It needs to be stiff enough to hang flat and survive a hole punch. Thin paper curls and tears at the hole unless it is glued to a card backing.
What size is a standard gift tag?
There is no single official size, but a rectangle of about 2 x 3.5 in (5 x 9 cm) is a practical classic. It leaves room for two names and looks right on most boxes. Scale down to roughly 1.25 x 2.25 in (3 x 6 cm) for small gifts.
How do I stop the hole in a gift tag from tearing?
Place the hole about 3/8 in (1 cm) from the top edge, not right at the rim, and strengthen it. A stick-on paper reinforcement ring works, or glue a small paper circle over the spot and punch through both layers. Heavier card also resists tearing better than thin stock.