How to Fold Clean Corners on a Wrapped Gift
Fold sharp, symmetrical ends on any wrapped box: trim the end paper, make four folds in the right order and crease every edge.
Tutorial at a glance
Materials
- A box already wrapped around its long sides
- Sharp scissors
- Clear or double-sided tape
- Bone folder or ruler
Neat gift wrapping corners are what make a present look carefully wrapped rather than hurriedly covered. The folds at the two ends of the box are where paper bunches, tears and puffs out, and they are also the easiest part to fix once you know the order of the folds.
Nothing here needs special skill. Clean ends come from three habits: the right amount of paper, folds made in the right sequence, and a firm crease after each one.
Why ends go wrong
Most untidy ends have the same few causes.
- Too much paper. Extra length at the ends has nowhere to go, so it folds over itself into a thick, wrinkled wad.
- Loose paper around the box. If the tube of paper is slack, the end folds cannot sit flat against the box.
- Folds in the wrong order. Folding the sides in first leaves the top flap bulging.
- No creasing. Soft, rounded folds spring back open and look puffy.
Fix those four and the corners take care of themselves.
Start with the right amount of paper
Before any folding, look at how far the paper sticks out past each end of the box. It should reach a little more than halfway down the end; about two-thirds of the box height is comfortable.
If the paper is longer than that, trim it now. This single cut does more for your corners than any folding trick. The full method is in how to measure wrapping paper.
Also check that the paper around the box is tight. The first long side should be taped directly to the box and the second pulled snug over it before it is taped.
Fold the end in four moves
Keep the box upside down on the table, with the seam facing up, and turn one open end toward you.
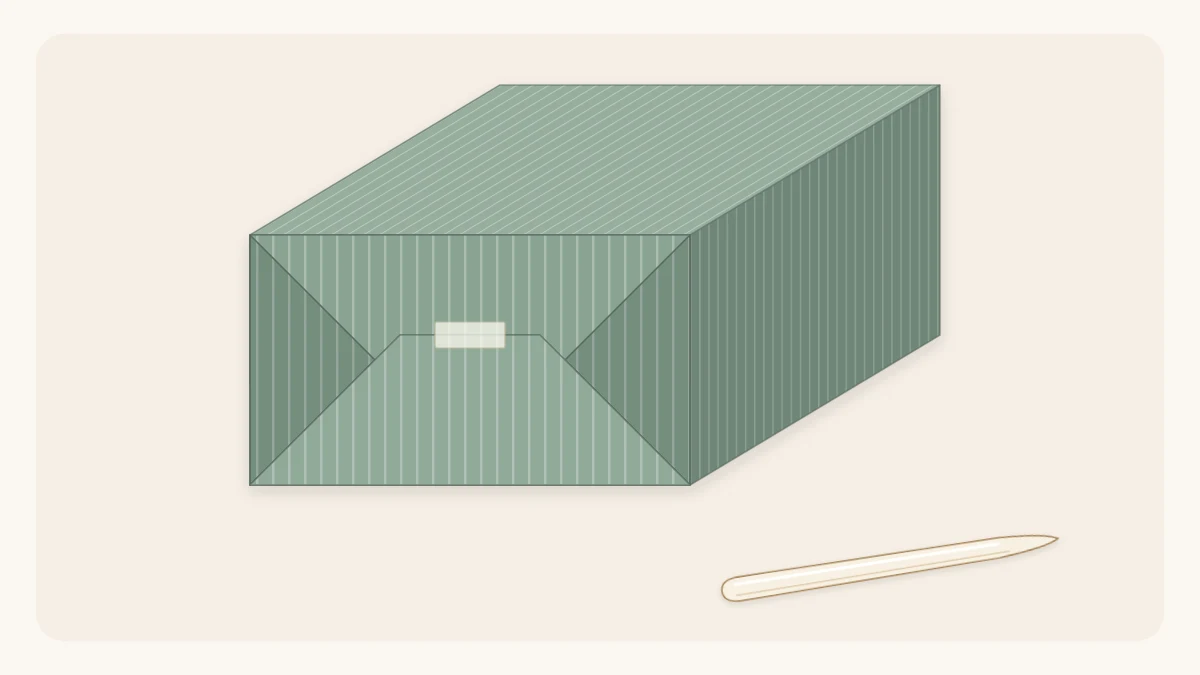
- Top flap down. Push the top flap straight down, flat against the end of the box. Two diagonal folds form at the sides as you do. Run a finger along the top edge of the box, then crease both diagonals.
- Side flaps in. Fold the left flap in toward the center, pressing it against the box, and crease along the vertical edge of the box. Do the same on the right.
- Shape the bottom flap. The remaining flap now has two slanted sides, so it looks like a triangle with its tip cut off. Sharpen both slanted edges between finger and thumb.
- Fold up and tape. Bring that flap up against the box, pull it gently snug and tape it. Repeat everything at the other end.
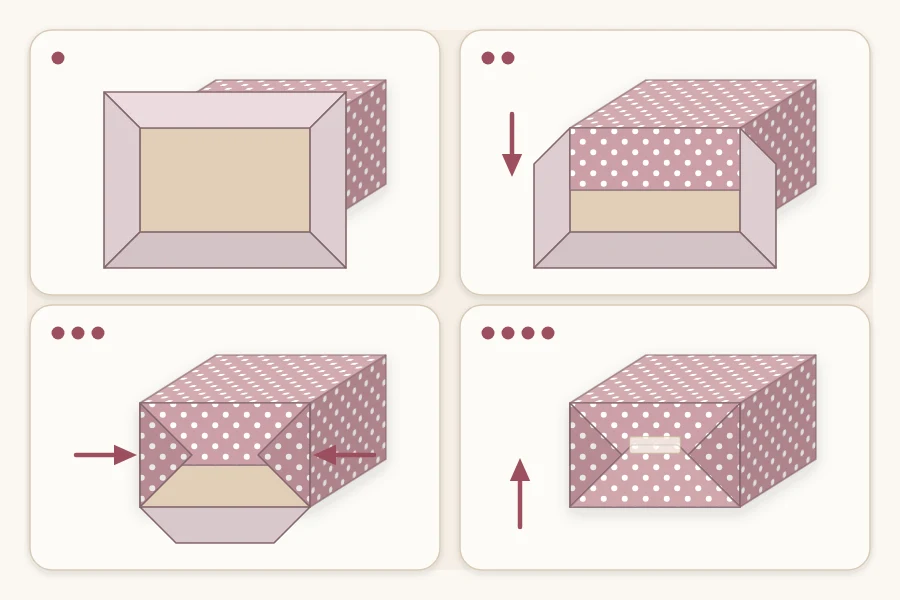
Because the box is upside down, the flap you push down first ends up nearest the bottom of the finished gift, and the last flap folds toward the bottom too. The visible end shows two symmetrical diagonal lines and no raw edges.
Tip
For an end with no visible tape, put a short strip of double-sided tape on the inside of the last flap, near the point, then press it against the box.
Crease every edge
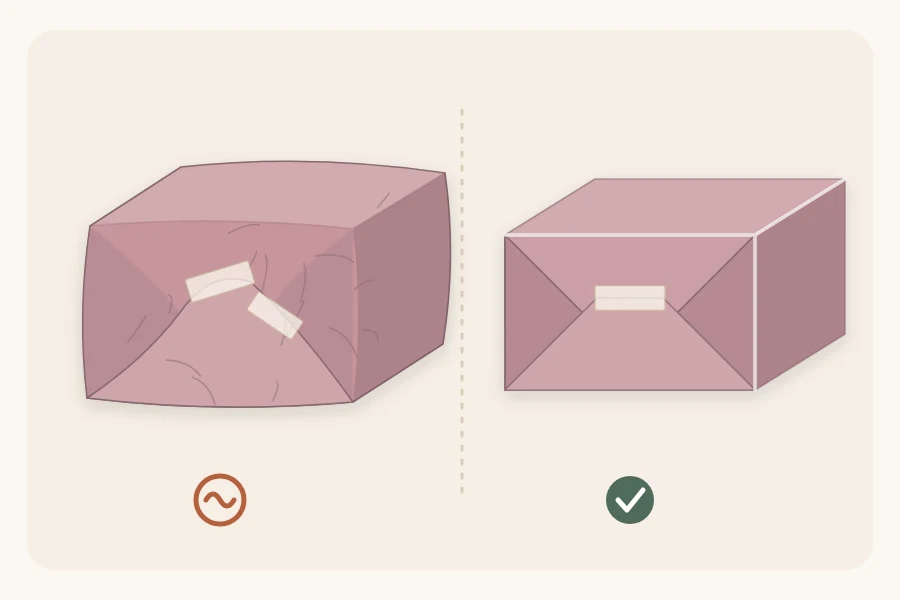
When both ends are closed, turn the gift right side up. Pinch the paper along each edge of the box, or run a thumbnail, a bone folder or the edge of a ruler down it. Do all twelve edges: four on top, four on the bottom and four at the corners.
Sharp edges make flat faces. Paper that is creased along the box edges looks tight even if it is not pulled especially hard.
Troubleshooting common corner problems
| Problem | Likely cause | Fix |
|---|---|---|
| Thick, lumpy end | Too much end paper | Open the end and trim |
| Point overshoots the box edge | End paper too long | Trim, or fold the tip under |
| Gap showing the box | End paper too short | Cover with a paper band or ribbon |
| Torn corner | Thin paper pulled too hard | Patch inside; use sturdier paper |
| Lopsided diagonals | Box not centered on the sheet | Even the ends before taping |
If the point of the last flap reaches slightly past the edge of the box, you do not need to start again. Fold the tip of the point under to make a straight edge, then tape the flap as usual.
Choose paper that folds well
Some papers fight you at the corners. Thin glossy paper tears where it bends around a box corner and shows every stray crease. Foil and metallic papers crease permanently, so a fold in the wrong place stays visible.
Matte, medium-weight paper is the easiest to fold cleanly, and kraft paper is strong and forgiving. If your corners keep tearing, the paper is a more likely culprit than your hands. The guide to types of wrapping paper compares how each one behaves.
Adjust for different box shapes
The four moves stay the same on every box, but the flaps change size.
- Flat boxes: the end flaps are thin strips. Fold them slowly and use a narrow piece of tape.
- Cubes: the flaps are large, and the diagonals are long. Crease them firmly before folding the sides in.
- Tall boxes: lay the box on its side and treat it as a long rectangle.
There is more on each of these in how to wrap a box of any size.
Finishing touches that flatter the ends
A ribbon tied in a cross runs over the middle of each end and helps hold the flaps flat; how to tie a bow on a gift shows the cross tie. Keep the ribbon flat where it passes over the end folds.
The same end fold also works without tape at all, held by a tuck or a ribbon instead. If you want to try that, read how to wrap a gift without tape.
Practice the four moves on an empty box with scrap paper. After two or three tries your hands will find the diagonals without thinking about them.
Frequently asked questions
Why are the ends of a wrapped gift bulky?
Bulky ends almost always mean there is too much paper past the end of the box. The extra length folds over itself several times and cannot lie flat. Open the end, trim the paper so it reaches only a little past halfway down the box end, and fold it again.
Which flap is folded first at the end of a box?
With the box upside down, fold the top flap down first, flat against the box. That creates the diagonal folds at the sides. Next fold the two side flaps in, and finish by folding the pointed bottom flap up and taping it. Changing the order usually leaves a bulge.
How do you get sharp edges on wrapping paper?
Pinch the paper along every edge of the box once the gift is wrapped, or run a thumbnail, a bone folder or the side of a ruler along it. Creasing after each fold at the ends helps as well. Medium-weight matte paper holds a sharp line better than very thin paper.